Preface
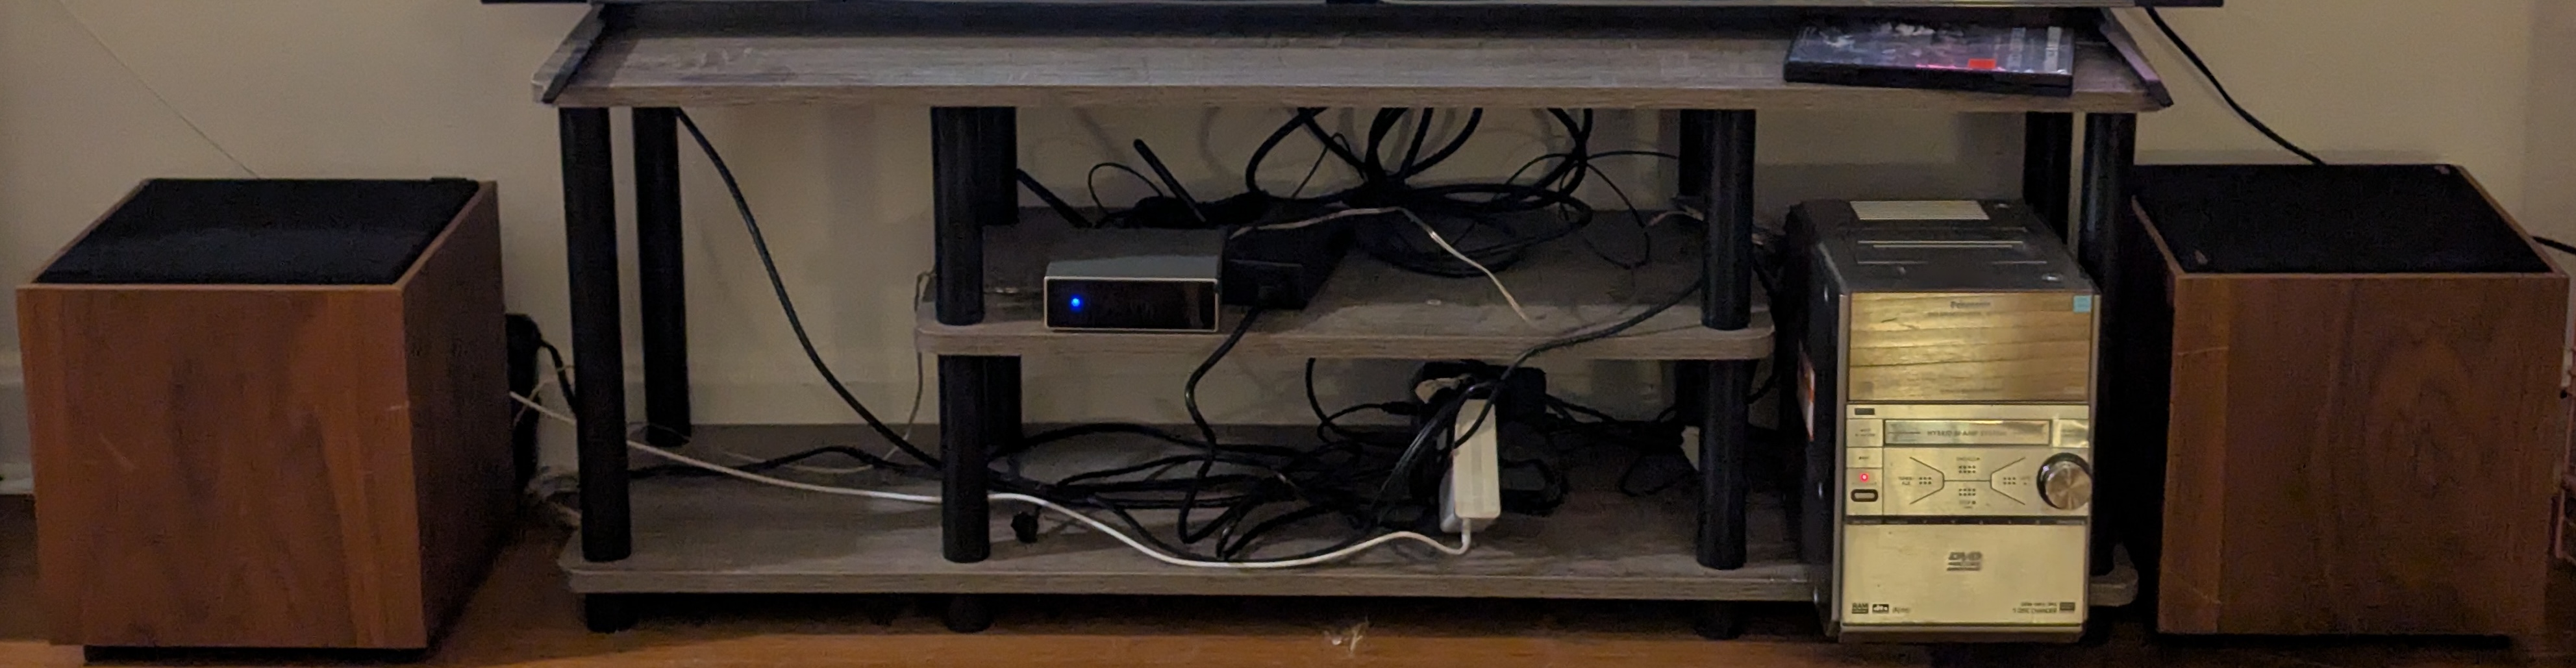
The story all started with this shitty little boombox—a $10 Goodwill find I picked up with my wife. The FM and CD player let us replay my father-in-law’s CD collection (gifted to us in a carry-on suitcase). The convenience is great, but the sound is genuinely terrible. So I started thinking about replacing its two speakers using parts from Parts Express.
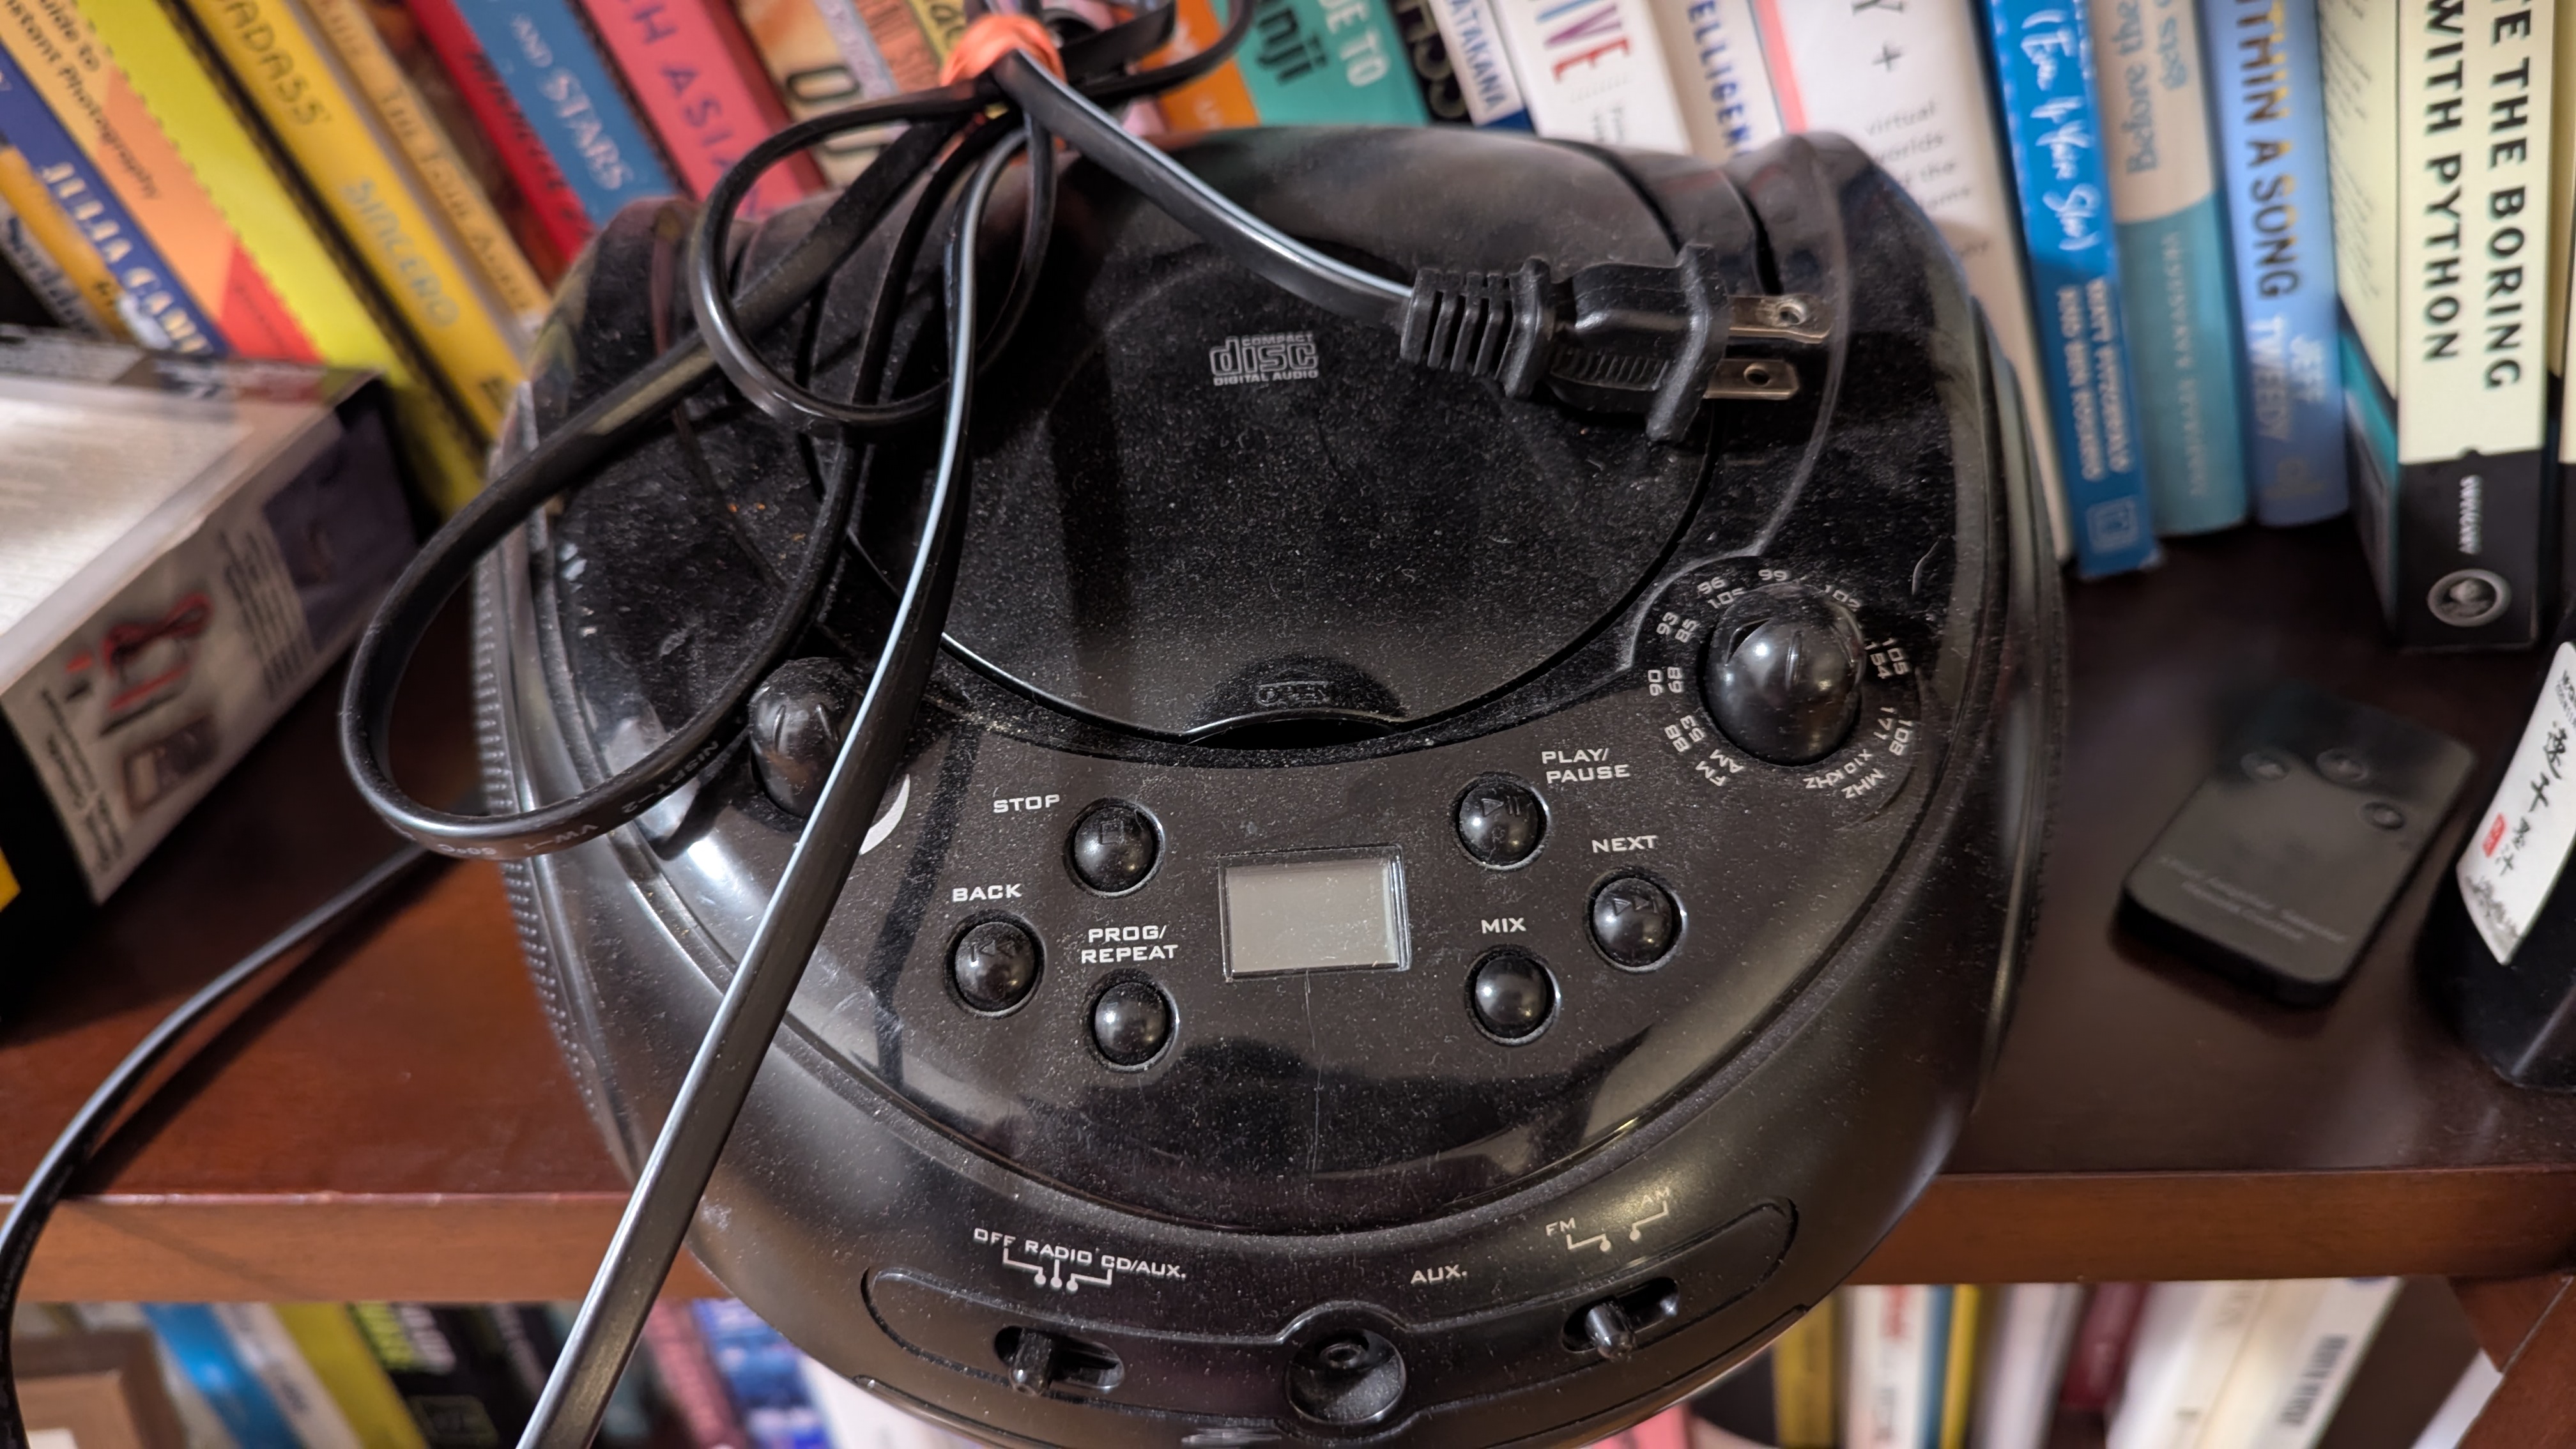
However, as I dug in, I realized how complicated it would be to salvage this setup:
- Either swap the speakers (but the plastic case leaves almost no room for modification).
- Or use it purely as a front-end source, extract the signal, and connect it to a good DIY speaker (but it has no analog output, and pulling a clean digital or analog signal off the board is a nightmare).
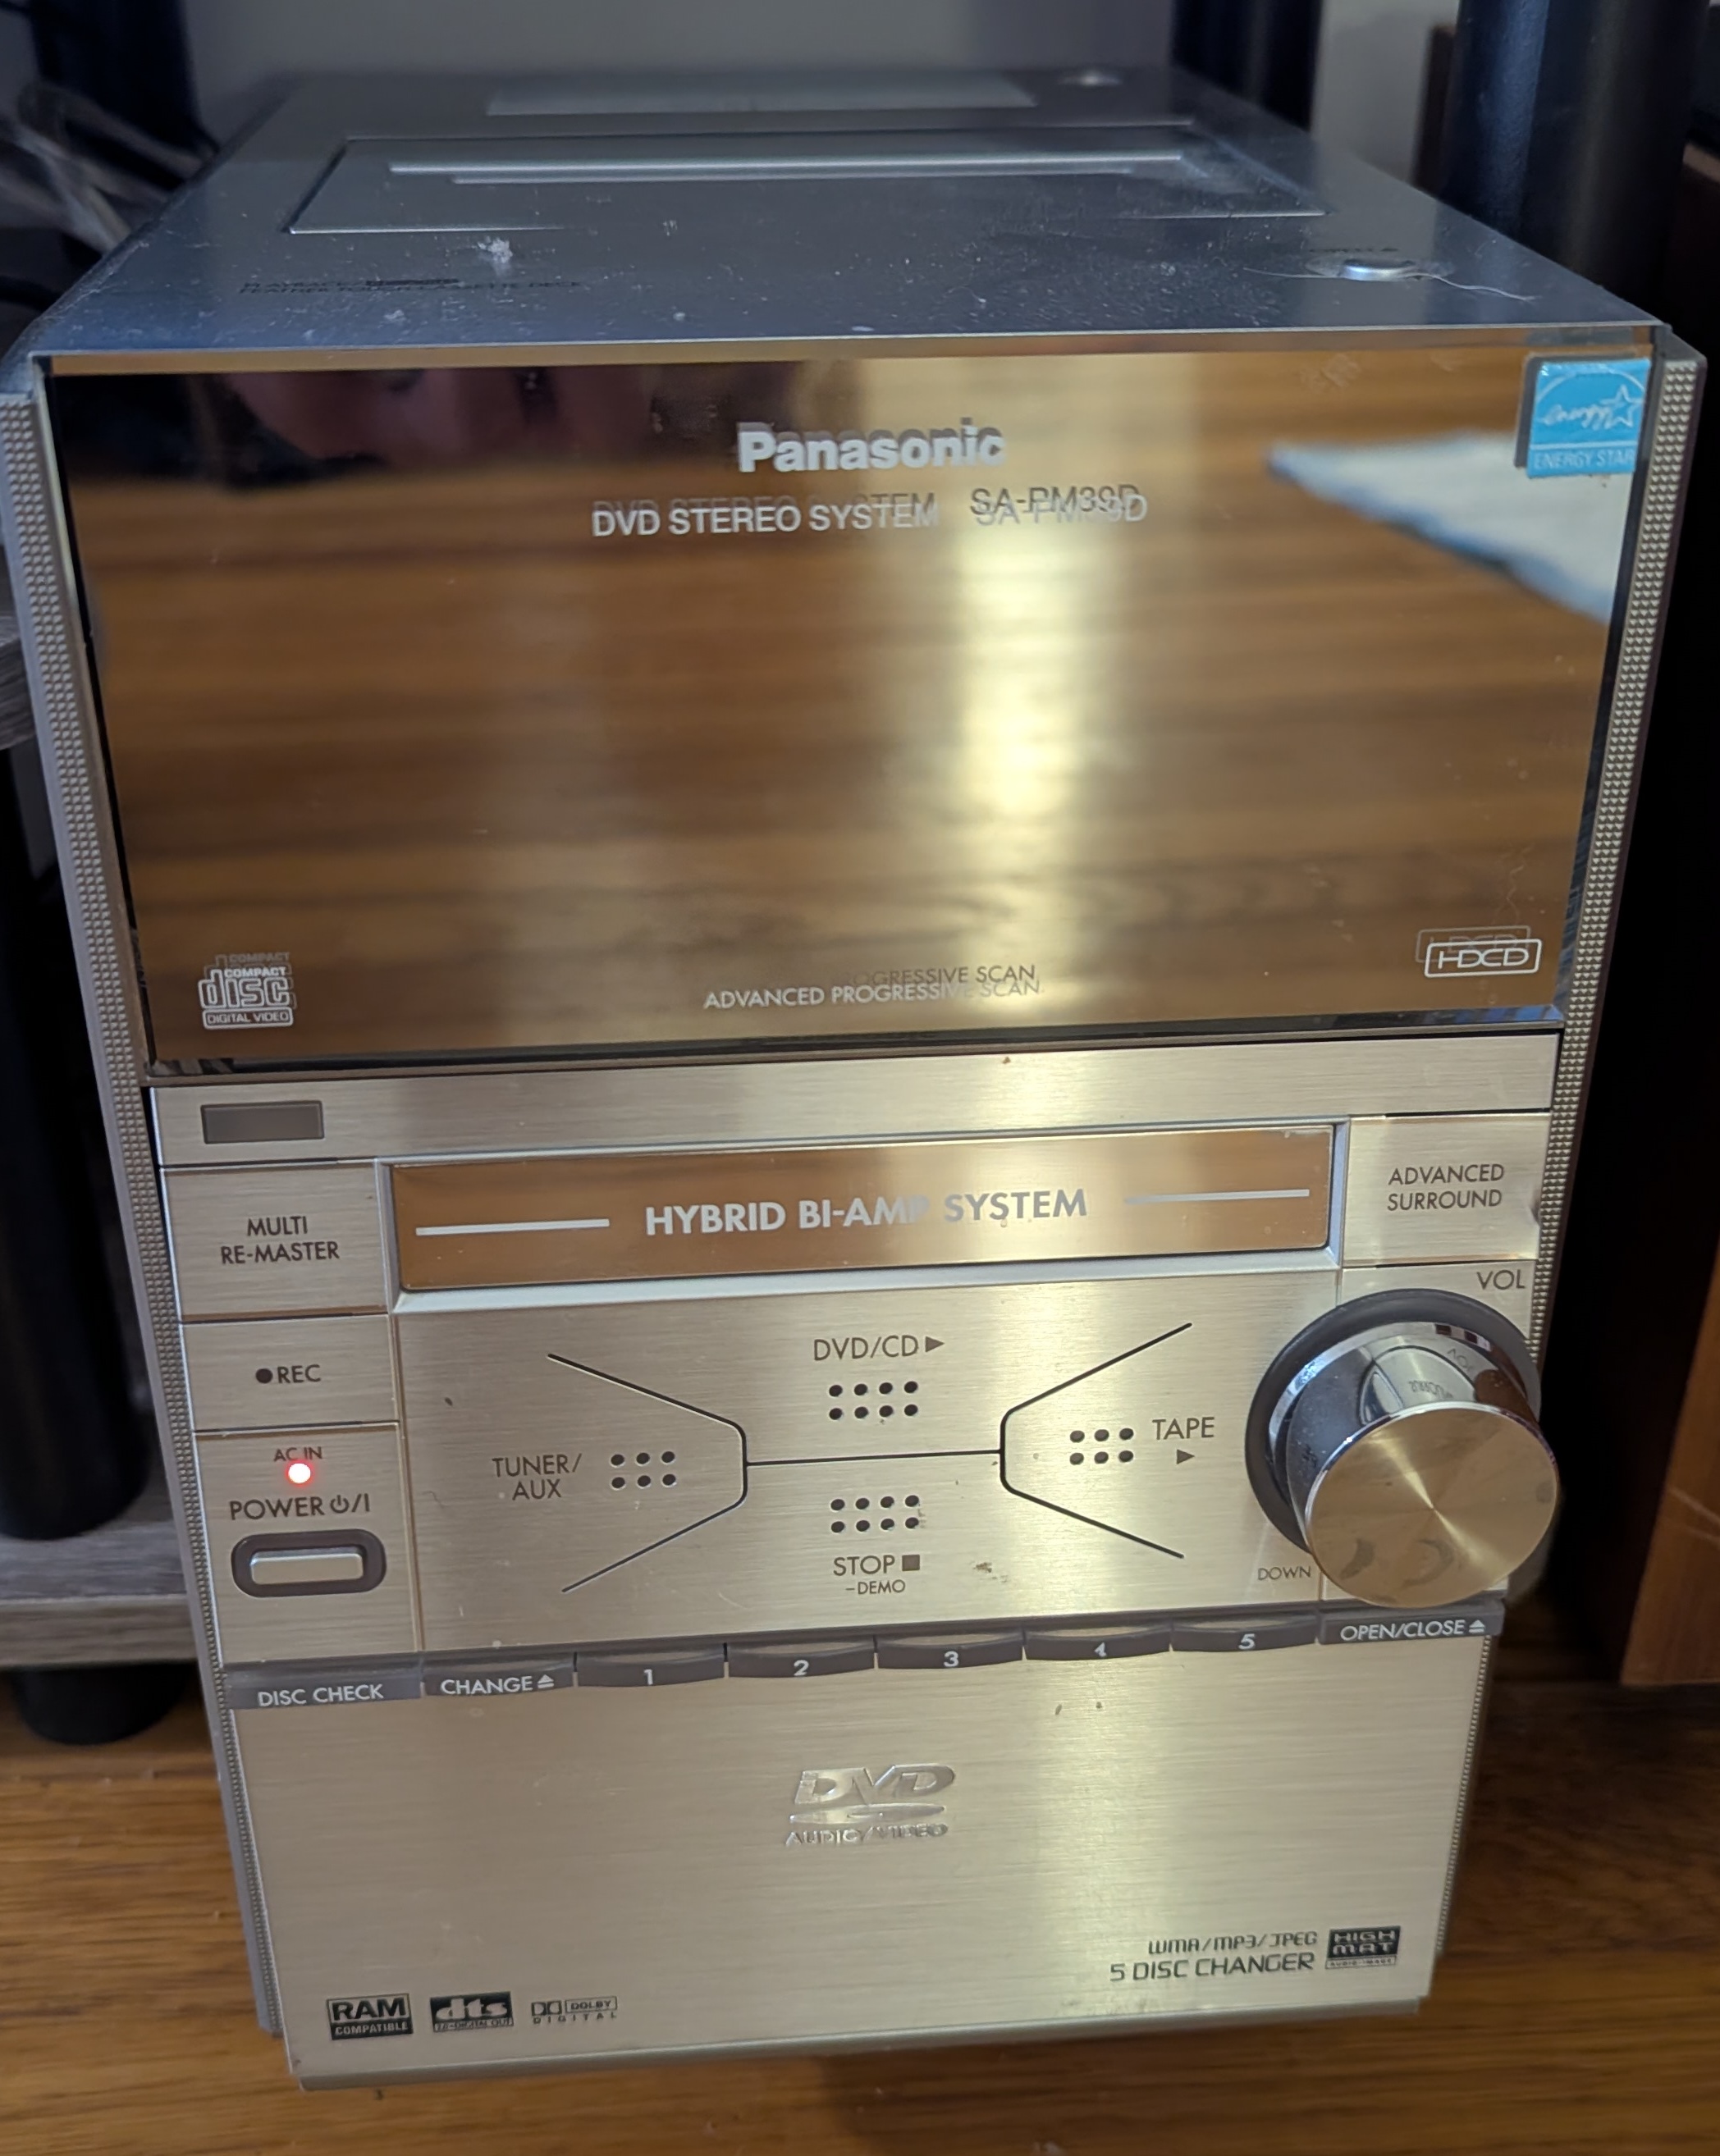
Eventually, I found a Panasonic SC-PM39D on shopgoodwill.com for $43 shipped. It has a cassette deck, CD, DVD, and crucially—an Optical Digital Output.
Now we need a speaker, so I recall the OD-11.
Why teenage engineering?
I remembered this YouTube video from years ago, which led me to look into the elegant minimalism of the OD-11. Placed inside the Villa Erskine, everything looked perfect, perfectly matching modern home styling.
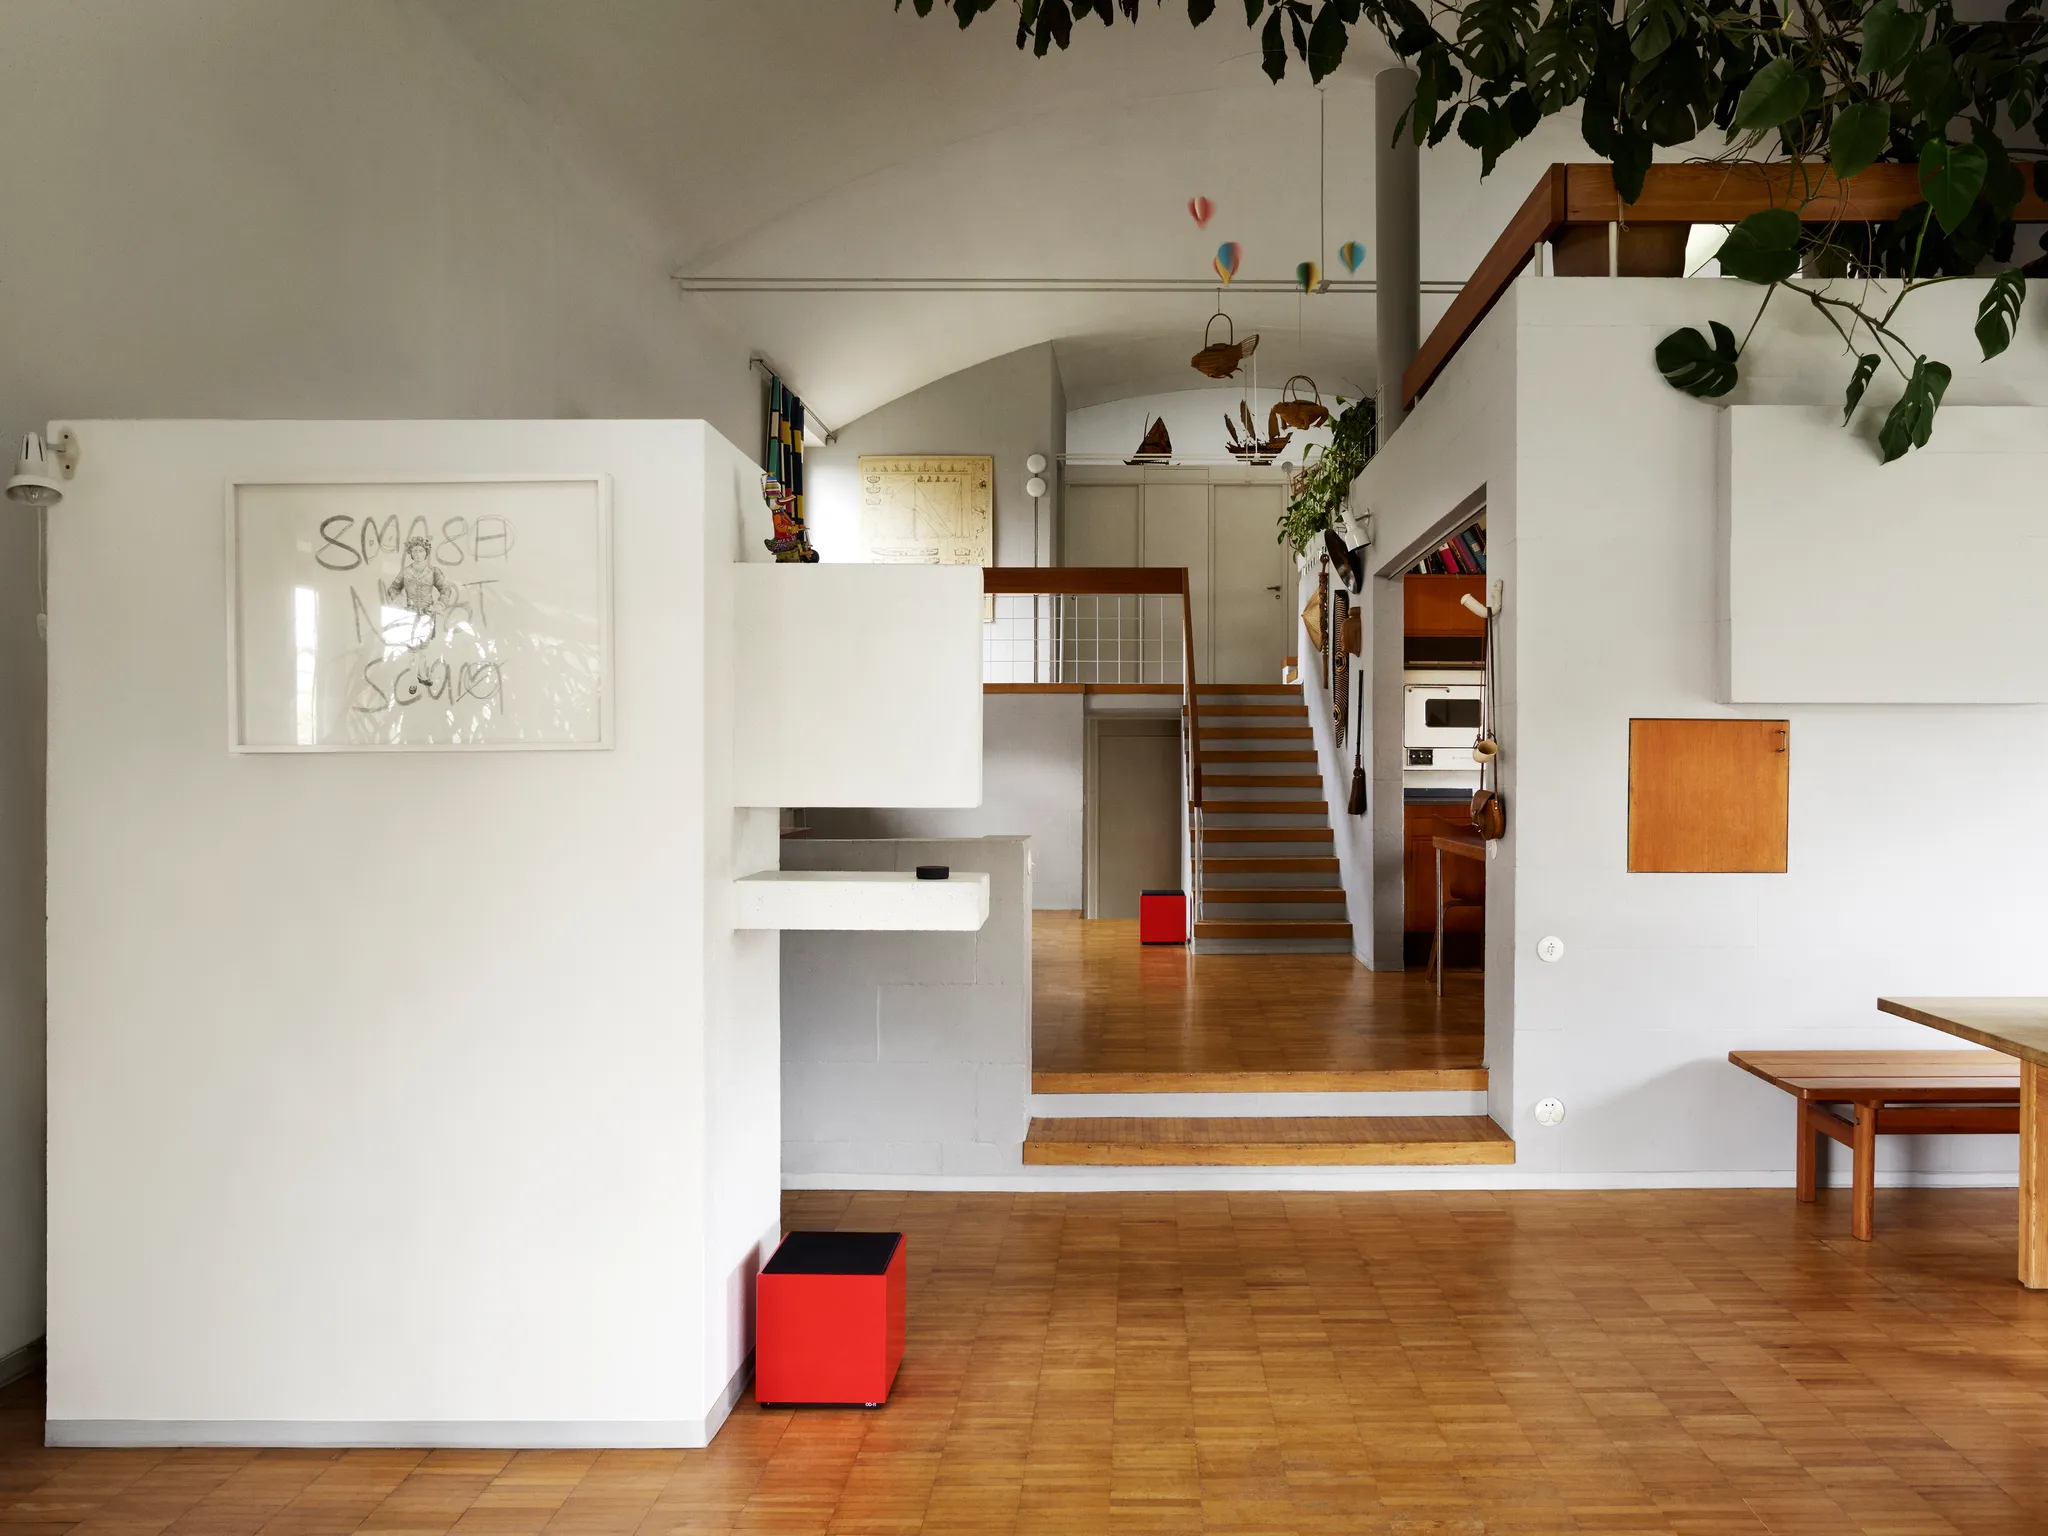
Also reminds me the Georgia O’Keeffe’s home in Sante Fe.

This Wi-Fi speaker, released in 2014, comes with everything needed for modern connectivity: Wi-Fi, Bluetooth, AirPlay, etc. But at $999 each (technically $2000 for a stereo pair), it’s steep. Since I’m a broke PhD student, I decided to build my own using open-source parts (see the bottom for my final cost breakdown). I call it the Open-Source Carlsson Box.
Sonab OD-11
There is a bunch of resources maintained by CarlssonPlanet and the Stig Carlsson foundation. The outer look is easy to replicate, but the internal acoustics are tricky (even though you can find internal structure pictures here and there). A pair of TE OD-11s (for parts) sold on eBay this May for ~$500 each, but very few are traded in the US. Many sell on Sweden’s parent platform, Blocket, but considering the cost and shipping from Sweden, importing them isn’t practical.
Eventually, I got lucky and found an original pair on eBay this June for $260. Disassembling them helped immensely with the final design of this open-source project. (By the way, an Arylic A50+ can basically do the rest of what my open-source Wi-Fi speaker project does).
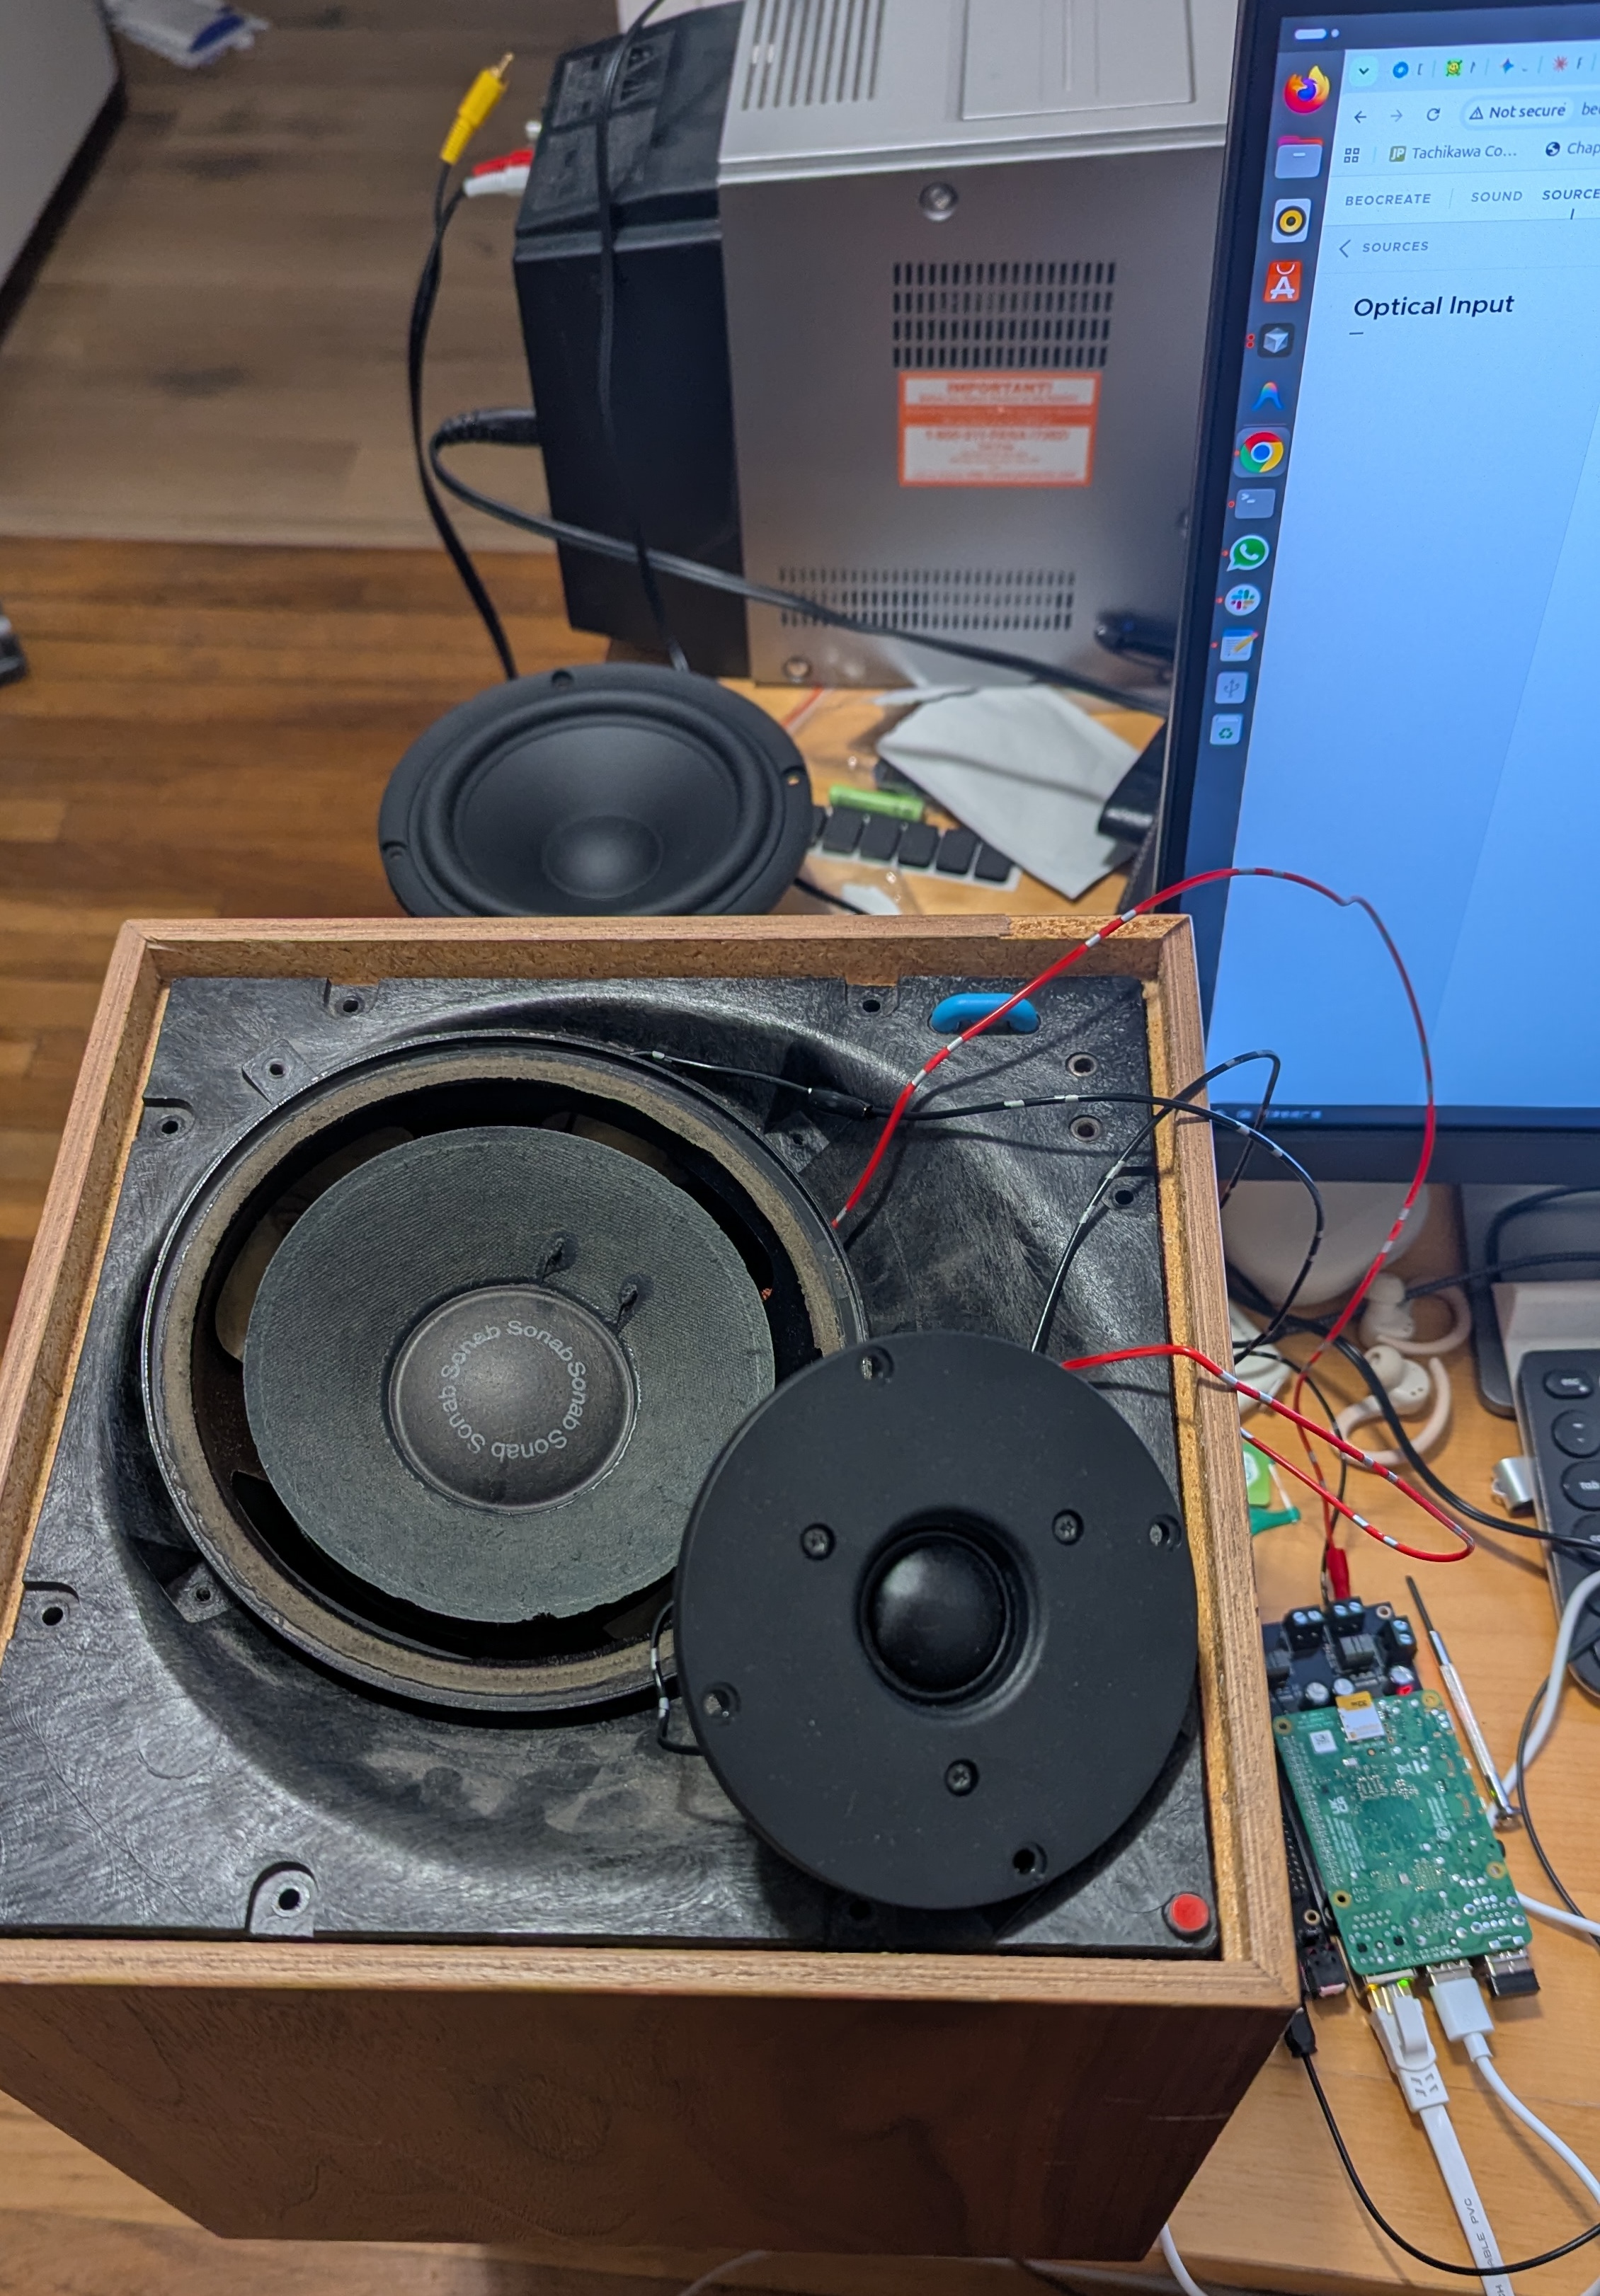
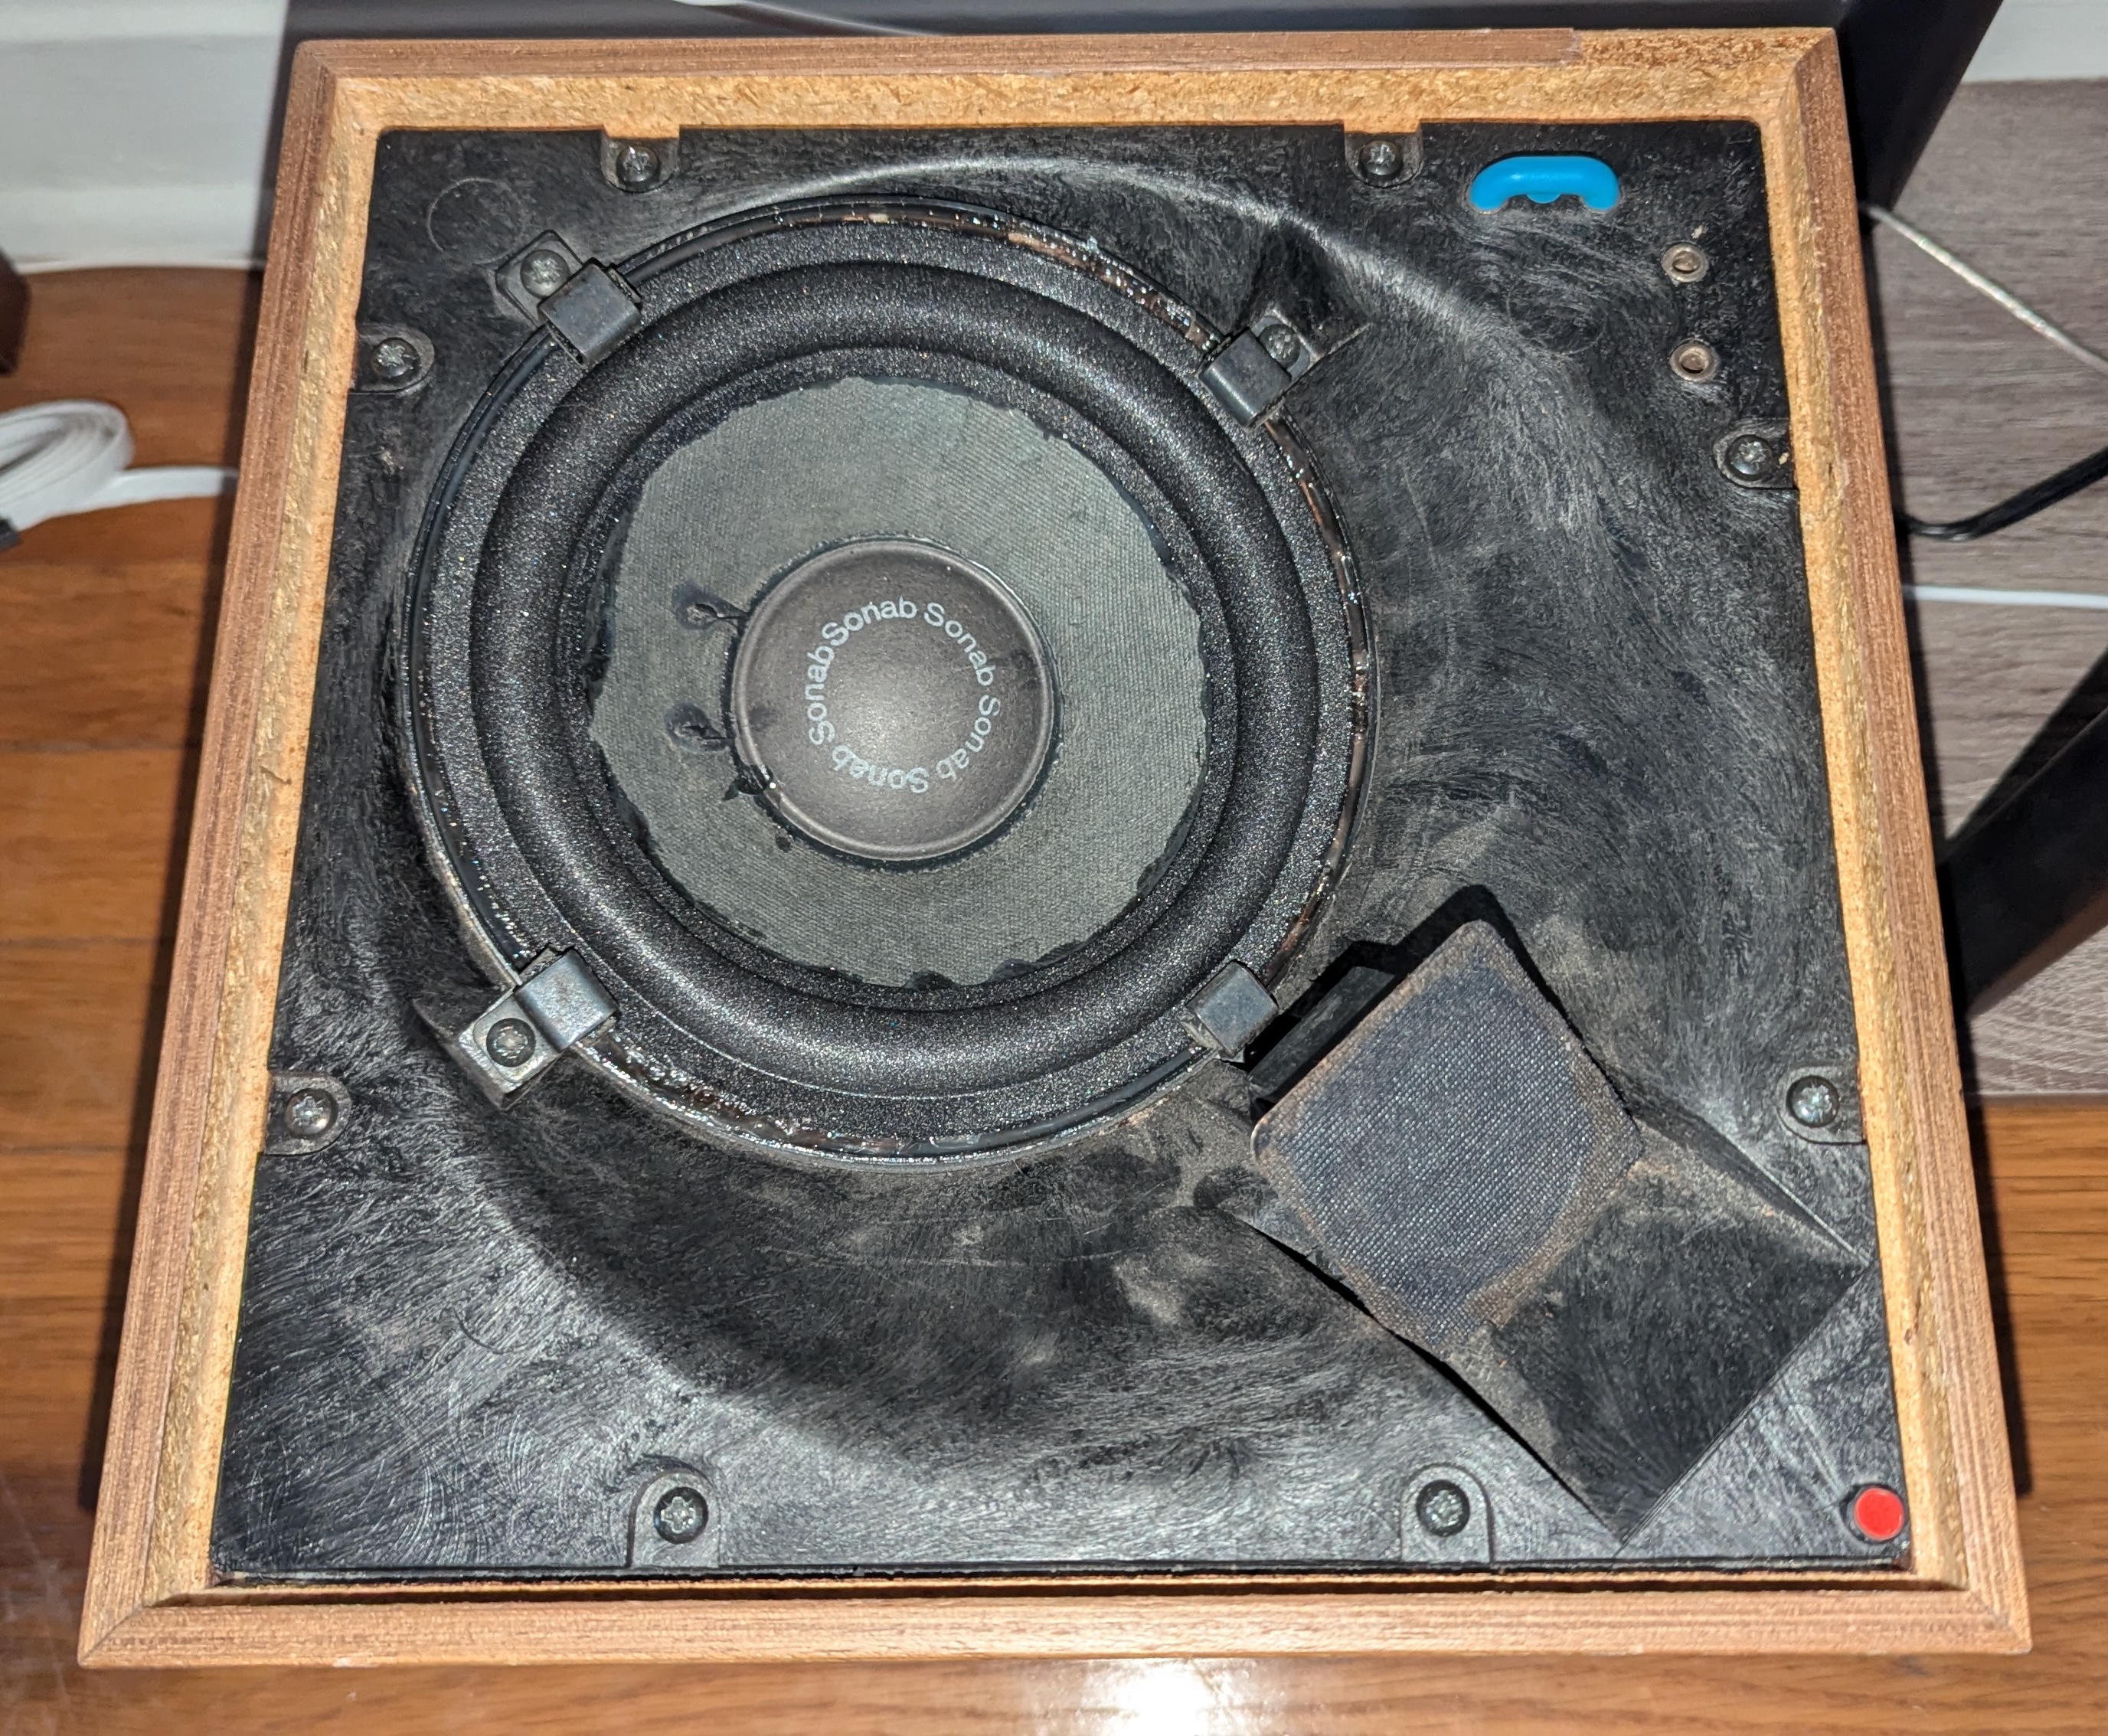
The breakdown for this repair (all from Aliexpress):
| Item | Unit | Qty | Total |
|---|---|---|---|
| 6-inch Foam ring | $3.4 | 2 | $6.8 |
| 2-pin DIN speaker jack | $1.3 | 2 | $2.5 |
| 20 AWG Cable 10m | $3.8 | 2 | $7.6 |
(I probably should have stopped here, but where’s the fun in that?)
Choice of Woofer and Tweeter
The Swedish audio community at CarlssonKult has already done the heavy lifting here: swap the tired SC165 woofer for an SB Acoustics SB17NRX2C35. It offers significantly lower distortion, a very similar response curve, and it actually fits the OD-11 box. I followed that recommendation, but with one twist—I opted for the 4-ohm version (SB17NRX2C35-4) instead of the usual 8-ohm passive upgrade, since I’m doing active bi-amping and wanted to squeeze more headroom out of the amplifier.
For the tweeter, CarlssonKult often suggests the T22 cone (to stay true to the original ortho-acoustic look) or the expensive T12-oa dome. I went a different route: the ScanSpeak Discovery D2606/9220 (a soft dome). CarlssonKult’s own measurements show this driver (essentially the Vifa D27TG) has excellent distortion characteristics (2nd harmonic <0.4%, 3rd harmonic <0.1%) and a smooth response, making it a highly cost-effective choice. Plus, with DSP handling the crossover, I don’t need a cone driver to force a workable handoff. The ScanSpeak is easy to source in the US, and its sensitivity is close enough to the SB17 (~91.5 dB vs. 90 dB) that I just need to knock the tweeter down by about −1.5 dB.
The crossover sits around 2.2 kHz using a 24 dB/oct Linkwitz-Riley filter. The planned electrical sum looks basically flat through the handoff:
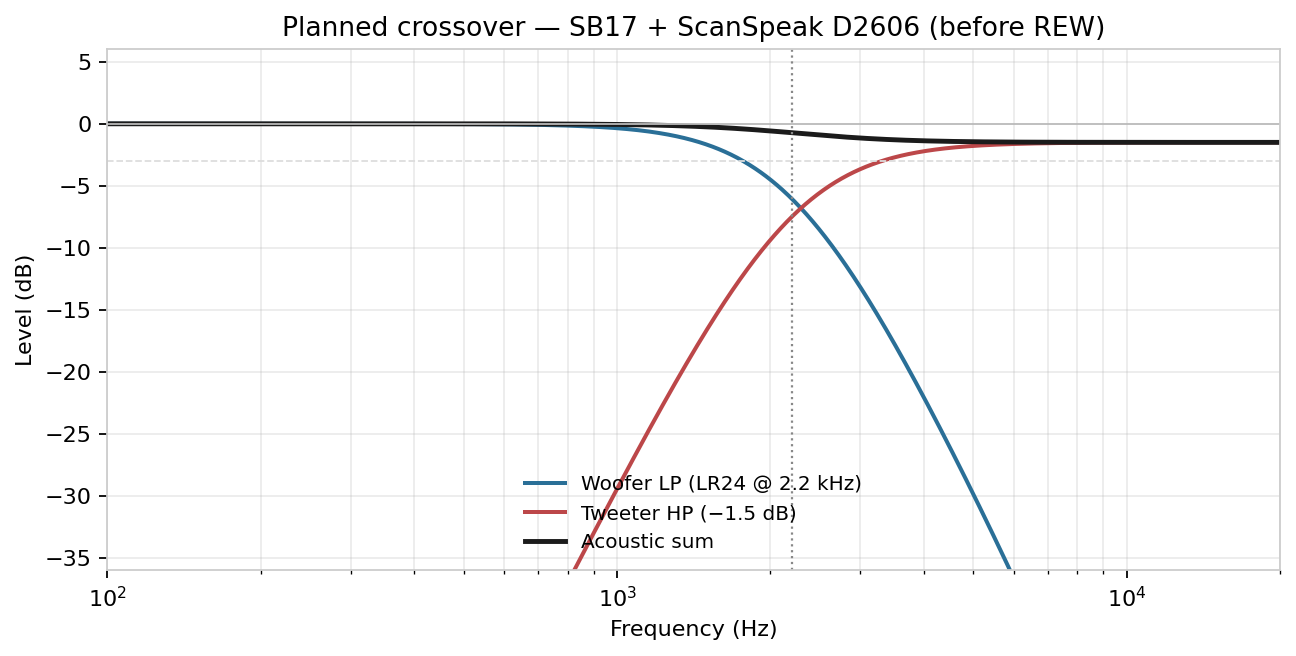
I plan to do the real calibration with REW once the speakers are built, will update that in part 2.
Choice of DSP
I used the HiFiBerry Beocreate 4-channel amp + a Raspberry Pi 4 per box. One board gives you DSP, bi-amp power, optical in/out, and a Pi for Wi-Fi and digital signal input.
Why not just a passive crossover + separate amp? Active bi-amping lets the crossover live in software (filter, gain match, EQ) without a bag of caps and coils. Toslink daisy-chain keeps TV/CD latency near zero, while the Pis handle wireless. And a vented ~10 L cube really needs a steep subsonic protect so the woofer doesn’t unload below the port — which is exactly what Beocreate is good for. Channel A to tweeter, C to woofer.
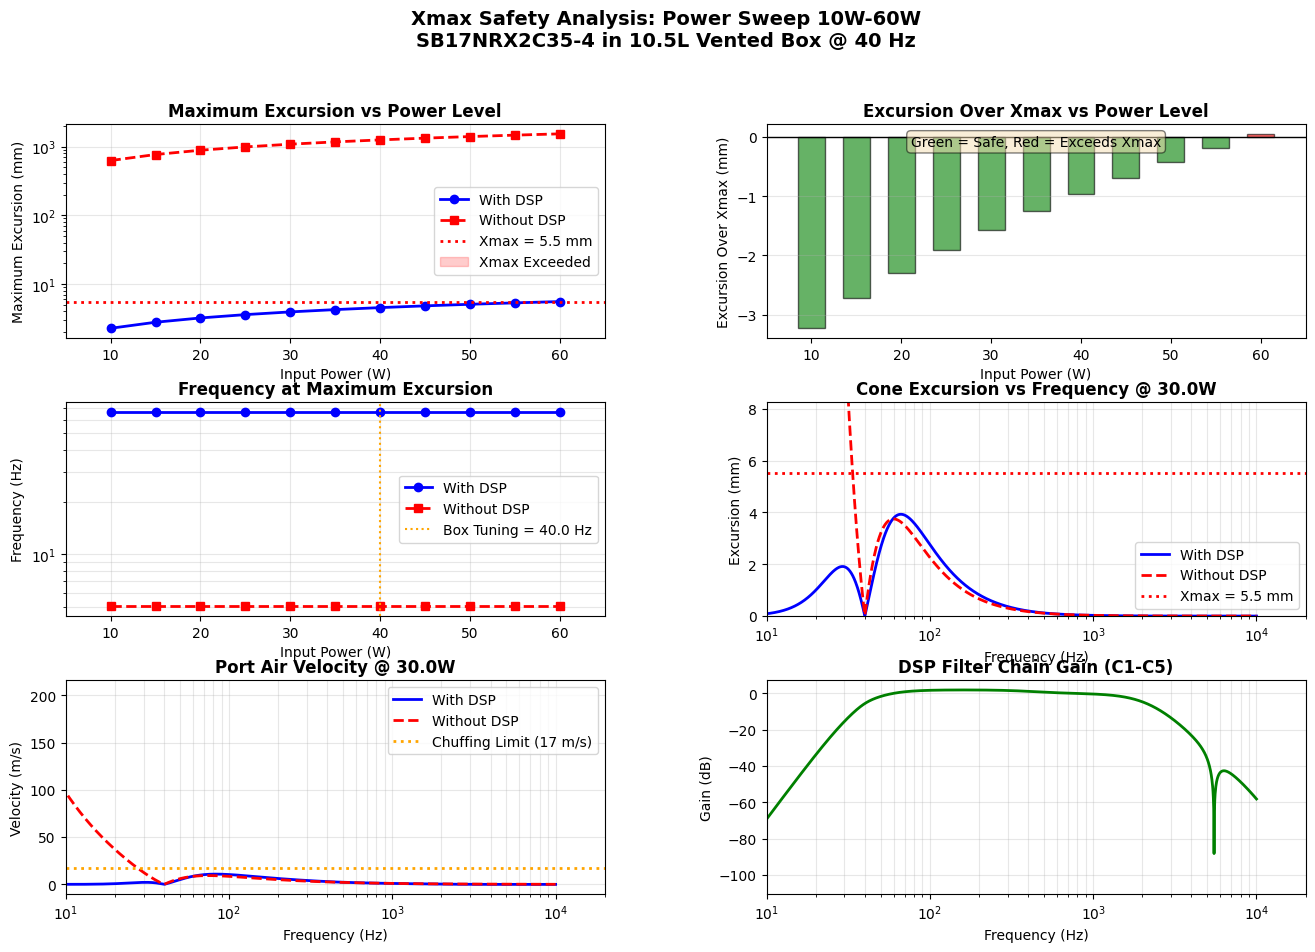
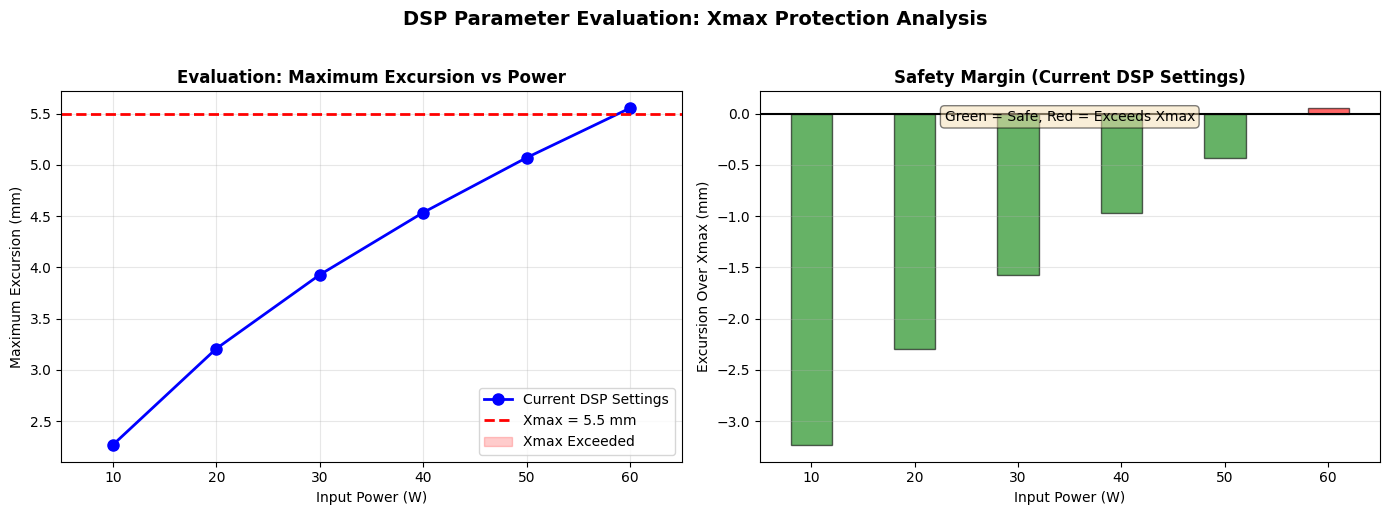
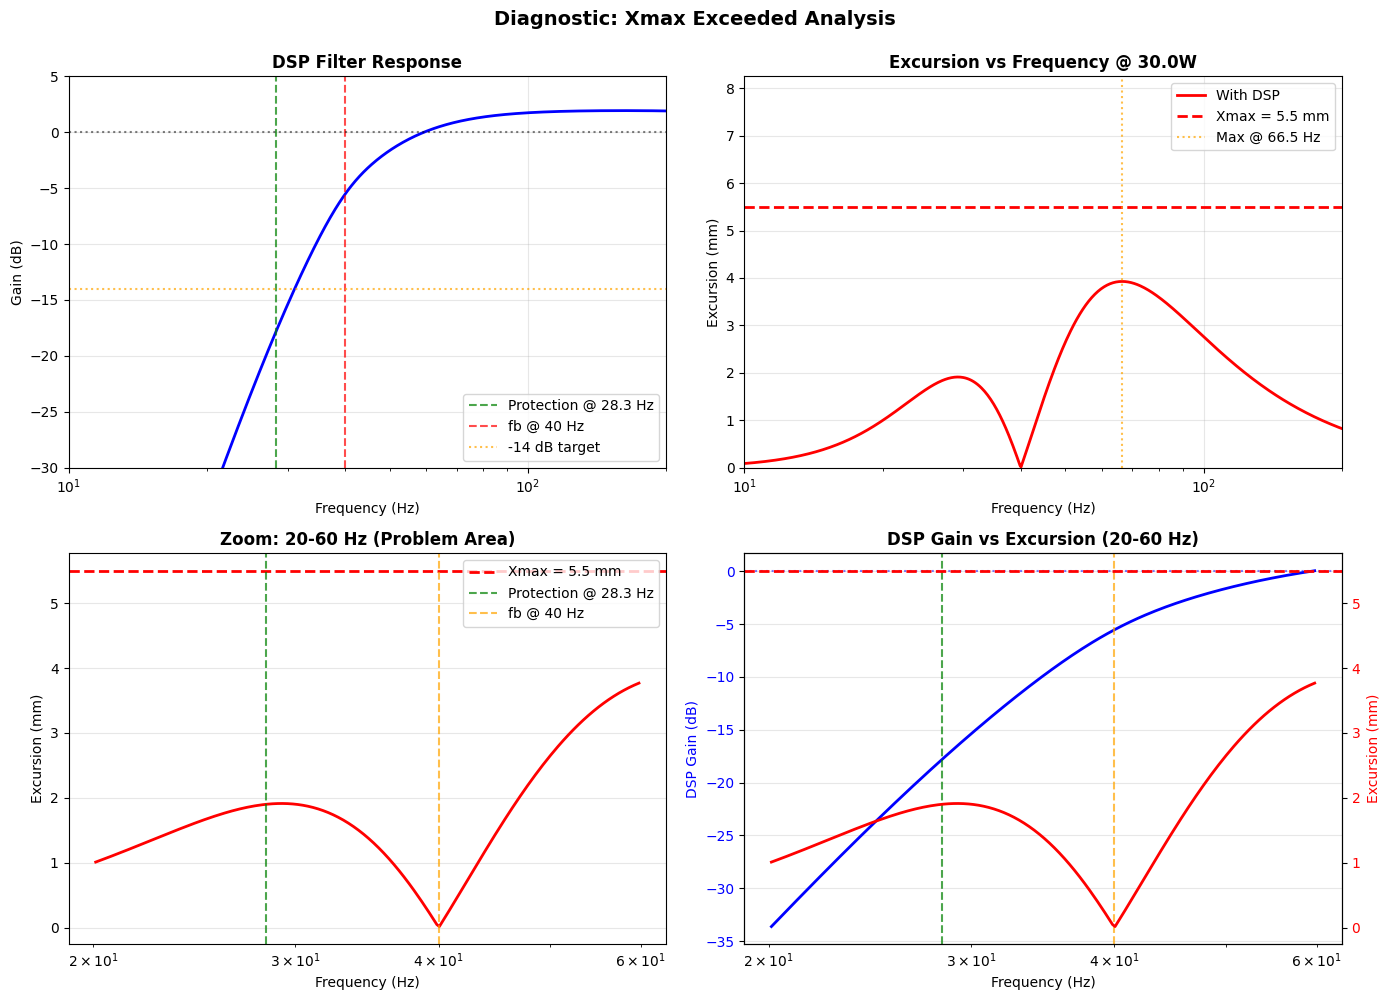
Below is the planned excursion math from the jupyter notebook (SB17 in 10.5 L, fb ≈ 40 Hz, Xmax = 5.5 mm). Without DSP the cone basically runs away below tuning; with the protection HP it stays under Xmax until roughly full rated power.
The Main Box Design
Our main sound source is digital optical from the TV or my Panasonic (plus Bluetooth or AirPlayed Spotify, of course). Since the Beocreate has a four-channel amplifier, we can use one board to drive two speakers. However, that forces a master/slave speaker setup instead of allowing each speaker to be an independent Wi-Fi unit.
Eventually, I utilized the Beocreate’s input and output optical ports (which required jumpering the three-pin SPDIF header to extend the port to our box exterior). This lets us simply connect the left and right speakers with an optical cable. On the bottom, you’ll find two SPDIF digital ports: one input, one output for synchronization. The left/right pairing is handled inside HiFiBerryOS.
You’ll also find an RJ45 port on the bottom for connection and debugging. Even though you can debug via Wi-Fi most of the time, doing the initial OS flash and network setup over LAN is highly recommended.
The outer box is made of MDF with Fumed Aspen Wood Veneer. Manufacturing these side boards took a long time, mostly just trying to keep them square and uniformly sized (I bought a Ryobi BT3000 for $170, including a router, specifically for this project).
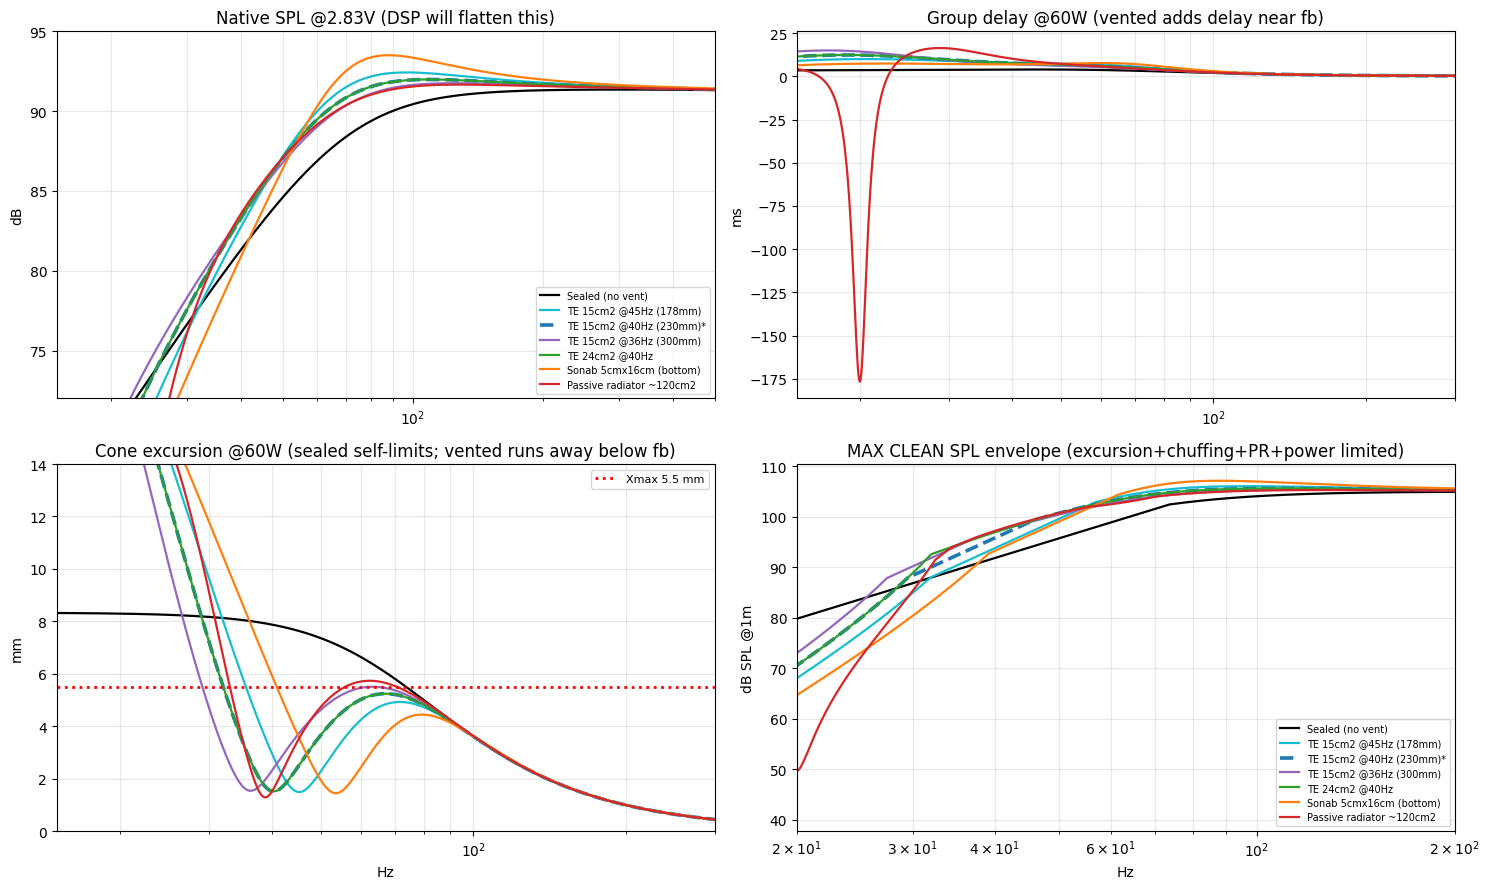
One big debate was the bass loading: sealed vs a TE-style ported half-pipe vs the original Sonab bottom port vs a passive radiator. I ran them in the jupyter notebook on the same 10.5 L model (what DSP cannot fix — cone excursion, port chuffing, PR throw, group delay). Teenage Engineering claims the OD-11 does 28 – 20,000 Hz (−3 dB) with that flow-optimized bass reflex / half-pipe. For the SB Acoustics SB17NRX2C35-4 the hard mechanical wall is Xmax = 5.5 mm. Below the port tuning a vented box unloads the cone — without a steep DSP high-pass the sim throws tens of millimeters of excursion, way past that limit. Push a woofer past Xmax long enough and you are not just distorting: the suspension and the tinsel lead get abused. Looking back at my eBay Sonab OD-11, one woofer was “dead” from an intermittent tinsel braid — I kind of suspect over-excursion over the years is exactly how that lead failed. Hitting a TE-like ~28 Hz F3 in this box only works if the DSP keeps the cone from eating itself on the way down.
The TE 15 cm² half-pipe tuned ~40 Hz looks strong on paper — more clean 40 Hz headroom than sealed — though that small slot is chuffing-limited (~25 m/s at 60 W), and you still need the Beocreate protect so cone travel stays under 5.5 mm up to ~rated power. Passive radiator was the other tempting “no chuff” option, but the calc shows it does not beat the half-pipe: needs ~120 cm² of diaphragm (way too big), worse peak group delay (~16 ms vs ~12 ms), lower clean SPL @30 Hz, and at 60 W the PR itself overshoots a typical 13 mm Xmax (~18 mm in the model). So PR is not a free upgrade.
I still kept the ported half-pipe in the build—that is what the box is tuned around. However, to respect Teenage Engineering’s modern IP and put my own architectural spin on the project, I decided not to clone their internal layout. Instead of hanging the electronics on the half-pipe the way TE does (their class-D amp rides the duct for airflow cooling), I moved the Beocreate and power supply down into the bottom case. It’s the same acoustic bass concept, but with entirely different packaging—and the DSP is what keeps the SB17 inside its 5.5 mm mechanical limit.
To add a more ‘hybrid’ design and further distance it from the TE aesthetic, I added a JBL L-100-inspired sculptured air speaker grille on top. It’s made of 10ppi reticulated polyurethane foam (normally used in filtering systems). It requires careful hot wire cutting (figuring this out delayed my build plan to the end of the year). Also, if you look at the cross-section, you might notice the ScanSpeak Discovery tweeter is significantly taller (about 15mm above the upper plane). I had to make a cavity to avoid intersecting with it and to keep the overall height within an acceptable range.
To make this project truly open-source while protecting the design from unauthorized mass manufacturing—and from being scraped by LLM crawlers—I am releasing the glb assembly file and model under a Creative Commons Non-Commercial (CC BY-NC 4.0) license. You can use this customized viewer below to explore the internal details of my assembly, view cross-sections from different angles, and toggle between plain or path-traced rendering.
BOM list:
| Item | Unit | Qty | Total |
|---|---|---|---|
| Beocreate | $199.0 | 2 | $398.00 |
| 3D Printing parts | $77.2 | 2 | $154.41 |
| Raspberry Pi 4 Model B (4GB) | $75.0 | 2 | $150.00 |
| SB Acoustics SB17NRX2C35-4 | $74.1 | 2 | $148.20 |
| ScanSpeak Discovery D2606/9220 | $60.9 | 2 | $121.80 |
| 6 Fumed Aspen Wood Veneer 12” × 12” Sheets | $19.99 | 2 | $39.98 |
| Mean Well IRM-90-24ST | $16.8 | 2 | $33.53 |
| Shop ProWood 1/2 in. × 2 ft. × 4 ft. MDF | $27.48 | 1 | $27.48 |
| Veneer glue | $18.00 | 1 | $18.00 |
| MicroSD Card (32GB) | $7.5 | 2 | $14.98 |
| 18 AWG OFC Wire (50ft) | $7.9 | 1 | $7.85 |
| Cheap 110-24V 2A | $7.5 | 1 | $7.50 |
| C7 110AC cable | $2.6 | 2 | $5.13 |
| Toslink Cable (10ft) | $3.9 | 1 | $3.90 |
| DC Power Jack (Panel Mount) | $3.2 | 1 | $3.23 |
| Rubber bottom end | $2.2 | 1 | $2.18 |
| Attena | $0.9 | 2 | $1.80 |
| RJ45 cable | $0.7 | 2 | $1.45 |
| Sealant | $1.2 | 1 | $1.16 |
| SPDIF DLT1150A | $0.5 | 2 | $1.03 |
| C8 110AC socket leadwire | $1.0 | 1 | $0.97 |
| Screw bolts (M4x10, M3x8, M4x25, M5x25) | — | 78 | $2.40 |
| Total | $1,144.98 |
(to keep costs down, most of the cheaper parts were sourced from China)
Final thoughts: looking back at this design process, I probably just needed a BOM list like this to convince myself not to build one from scratch, and instead just repair the Sonab OD-11 and slap an Arylic A50+ on it.
But honestly, $1145 for two active DSP speakers is a great price, and it brings a bit more romance and noise into our home (well, now the noise is doubled). At the very least, I learned basic woodworking on my Ryobi BT3000, refreshed my SolidWorks skills, and built an interactive .glb CG viewer using three-gpu-pathtracer. There is something deeply satisfying about taking a complex, closed system, modeling its physical boundaries, and rebuilding it entirely in the open. As someone who spends their days working with AI, I can only hope that one day we’ll be able to open-source and inspect large language models with the same level of mechanical transparency we have here.
I’ll report back once I finish the physical build, especially the REW calibration.